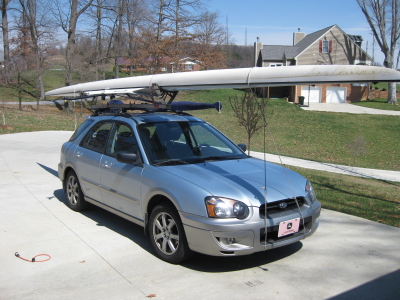
Suggestions for Car-Topping a Rowing Shell
Disclaimer: I have been transporting shells on top of cars since 1995. Below are some tips that I've picked up over the
years. However, I do not intend this page to be exhaustive and conclusive. Therefore, I claim no responsibility if you have
an accident or have any damage to your shell while following these instructions. Many of the techniques are impossible
to convey with a few words and a simple picture, thus much is up to you and your particular skill and attention to detail.
While driving if you feel, hear or see anything strange or concerning pull over and check out your rig.
|
 
|
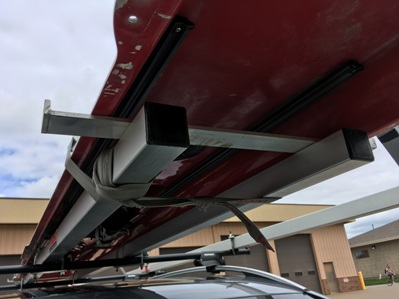
Attaching Shell Racks to Roof Bars
The first step is to use high quality roof racks. The best are Thule and
Yakima. Typically, the roof bars provided by the manufacturer have too much
bounce (too springy) in them and this has the potential to put a lot of strain on your shell. I've personally had
luck with Yakima racks. They use a round bar versus the square bar used by Thule. The round bar is very stout
and I've never seen it flex. At many regattas, I've seen Thule racks with a slight bow to them, which I presume
occurs after years of use and heavy loads. My Yakima bars are from 1994 and still straight as an arrow.
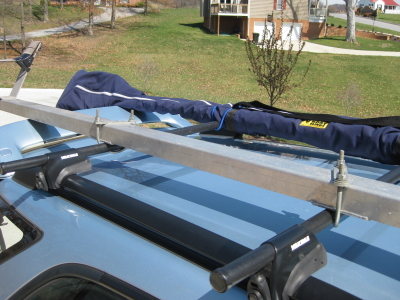
The one potential downside of round roof bars is that u-clamps usually fit better with the bolt ends facing the shell.
If possible you want to avoid this because the bolts can wear through your boat cover or into the gunwale of your boat.
If you put the flat piece of the clamp on the round bar you risk bending your clamp. I trust my own attention to detail
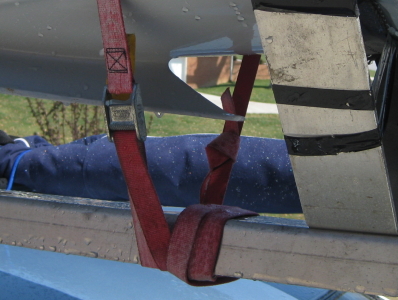
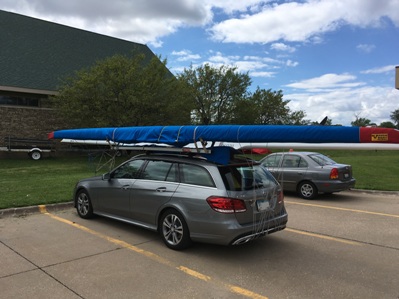
so I usually save the clamp and watch out for any rubbing. With 2x racks I almost always put the threads of the U-clamps
down (above picture is what not to do) to avoid contact with the shell gunwale. More on double racking at the bottom of the page.
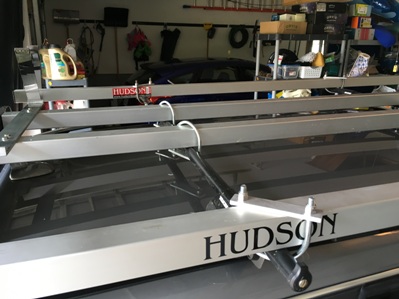
I just got another Hudson single rack (2016) and the v-saddles are a bit wider and lower to the main bar. So I've begun
just putting the rounded parts of the clamps up and the bolt ends pointing to the roof of the car. This does mark the
aluminum bar on the rack just a tiny bit, but does not do structural damage.
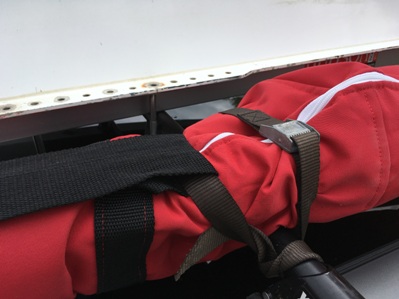
Another tip I like to do is alternate the direction of the clamps on the rack. You can see in the left photo how the clamps
face the opposite direction as they span the rack. In strong cross winds I've had the rack slide across the roof bars
when the clamps are in the same direction.
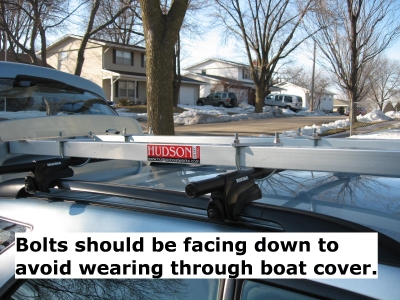
Protecting Your Boat Cover

Here's an example of how the rack clamps can rub through your nice, new boat cover. Whenever you attach something to the
roof of your car try to anticipate the strains and stresses that will occur at 70mph. In this case,
Burnham made the boat cover with extra fabric around the cockpit. At 70mph
the fabric will flutter and hit the ends of the clamps making a nice hole. A quick fix is to simple hook a bungee cord
around that area and the cover can't hit the sharp clamp.
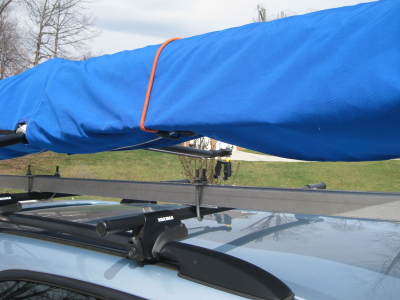
Even if I'm facing the clamps down I still put bungees on the cover. In my kit for car topping I have a bunch of straps,
bungees and guide ropes. Even if a bolt won't wear through the cover, the flapping at highway speed will wear out the fabric
in the cover (think old worn jeans). So still throw a bungee on if the cover looks excessively baggy anywhere. Burnham
began putting buckles on most of their single covers in 2015, but over the footstretcher it can be a bit baggy. And if you
have something sharp inside like a SpeedCoach bracket or something it'll wear through.
I also position the bungee hooks off-center and nearer the gunwale.
I once had a metal-hooked bungee in the center over the zipper and as the cover fluttered the bungee hook wore a hole in the cover.
Off-centering the hook seems to alleviate the issue. This entire site contains hints from the various failure modes I've endured
over 20 years car-topping boats. You're welcome!
Protecting Your Shell Rack

I see this all the time... Someone drops their boat off at the race course then heads to the hotel with their rack still
on the roof. However, without a shell in the rack the nylon straps flutter at 70mph. Nylon doesn't hold up well at that speed
so I'd suggest simply winding some electrical tape or a bungee cord around the slings. As you can see I just used electrical
tape and it stays there whether there's a boat or not. I use electrical tape as opposed to other types because it doesn't leave
much glue residue, is flexible and is relatively UV stable.
Hudson racks come with a shoelace to prevent them from fluttering (right photo). The Burnham racks have a heavy nylon cover with padding with
enough mass to protect from fluttering. Anyway, just do something to prevent the fabric from fluttering if you're driving
without a boat.
Attaching Your Shell to the Shell Rack
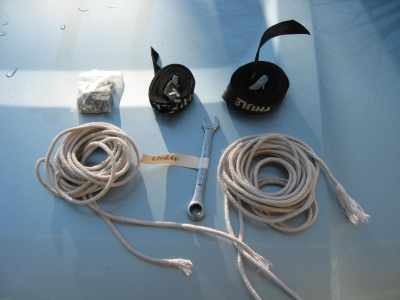
The supplies you need to attach the boat are pretty straight forward. I use two boat straps in good condition -- no fraying or partial
cuts. The straps are used to attach the boat to the boat rack. In really bad conditions, I'll sometimes use another one or two straps along the hull.
I'll use these extra straps to wrap around the hull and the roof racks themselves in the middle of the hull. However, two straps near
the V-brackets at the end of the shell rack typically suffice. I then use a couple
guide ropes made out of thick clothesline to stabilize the boat. The wrench is used to tighten the u-clamps for the rack.
I've had more issues with boat straps than any other. Getting the straps right seems to be more art than science.
The boat straps are your primary attachment mechanism for your shell. Other things can go wrong and you'll still have enough time
to pull over without severe damage to your boat. However, if a strap goes you may be calling your
insurance company.
My methods may not work for you, and I don't guarantee that they will either.
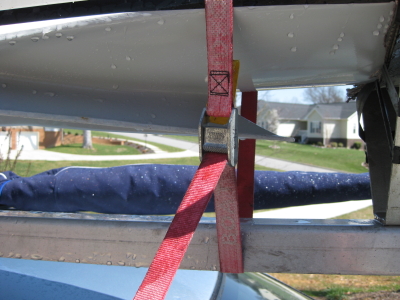
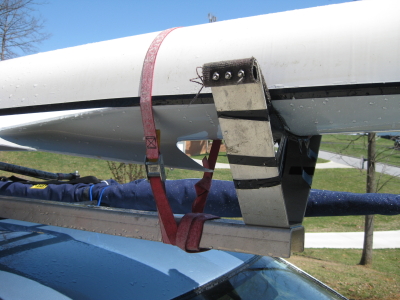
I make one loop around the hull in a manner that allows me to pull down on the strap to tighten. This entails reaching up behind the shell and over the hull
to get the buckle positioned correctly such that you're pulling down to cinch it. The rack usually has a little
give so being able to put my weight behind pulling down seems to help. I then wrap the excess strap around the rack toward the
front of the car. Remember at 70mph the excess strap will want to slide down the rack toward the rear of the car. On the last loop
I tie the strap on itself and pull as tight as I can.
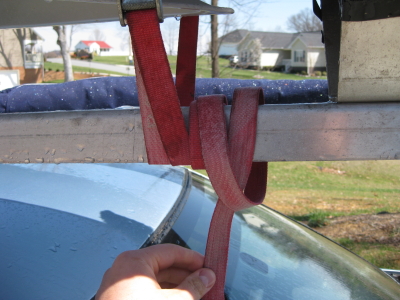
I usually make my straps pretty tight. A problem you can have with tight straps is they can vibrate when the car is moving fast.
It's like a piano string at 70mph. I've had the vibration wear into the painted surface of the boat - a particular issue
with wet sanded hulls. If you don't have a cover and are strapping down a wet sanded hull I'd recommend a cloth between the hull and strap.
I nice trick I use is to tie the last few inches of the strap onto the portion opposite the buckle. This extra mass on the tight side will dampen the
vibration. You'll also notice that the knot faces up. It's a little tricky to wrap the flat strap around itself to get a flat, tight
knot with little excess. If you hear anything vibrating as you drive pull over and check your straps. They may be loose.
I place the bow of the car to the front of the car. I don't imagine it make a huge difference for singles and doubles. It's like placing the spoons
of your oars to the rear. You don't want any pushing due to wind resistance at the leading edge of a long narrow body. It's why the fin is in the back
of rowing shells as the go through the water or fins on a rocket.
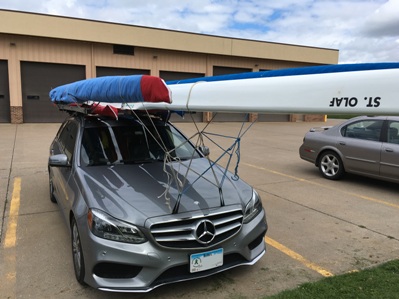
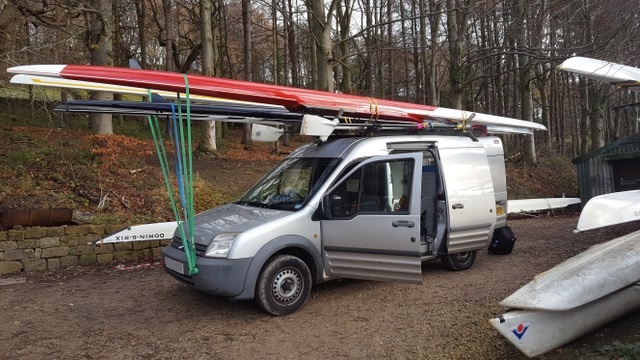
Guide Ropes for the Bow & Stern

I would recommend that you never transport a shell without guide ropes in the front and rear. On most cars the roof bars are
only spaced 2 to 4 feet apart. It may sound obvious that a single or double is much longer than that. Most roof rack systems are
rated for a couple hundred pounds which is plenty for a lightweight boat sitting still. But at 70mph on a bumpy highway the long
lever sitting on top of your car can generate tremendous forces. The guide ropes help prevent the shell from rocking frontwards
and backwards. You do not need to put much strain on the hull by pulling really tight. Just nice snug ropes will work fine to avoid
the boat pitching much.
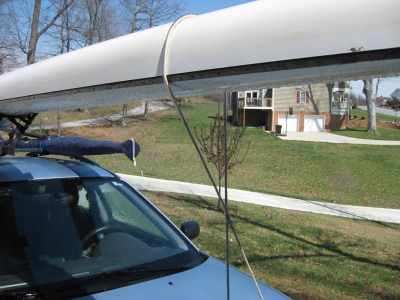
I wrap my guide ropes around the hull and tie them off to something
permanent and solid on the front and rear bumper. I tie a knot in the rope to create a loop then place the rope along the hull
perpendicular to the ground. In the rope shown, I've even put the rope inside of a piece of clear plastic tube to help prevent rubbing.
However, I've since been using rope without plastic tubing with no ill effect. If the rope is taut enough it should not vibrate or rub.
If any of your straps or ropes vibrate while moving please stop and check out your rig. You should also ensure that the length of the rope
is long enough to tie the knot, but not too so it does not get caught in the axle or tire if the knot comes undone. Many boats have been
snapped in half by straps or ropes that work loose and wrap around an axle or tire.
From the years I've had this site up, whether to use guide ropes or not is the number one question I receive. The clothesline
is the cheapest part of this entire system and dead easy to tie four knots. Why wouldn't you use them? It makes the entire rig
rock steady and you'll never have to worry about a rough road, cross wind or passing a truck at highway speeds. Use them!
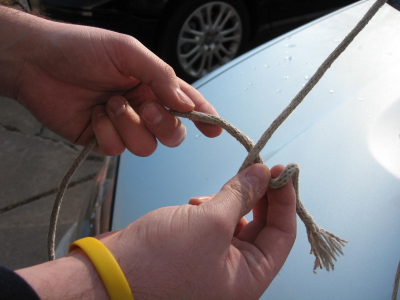
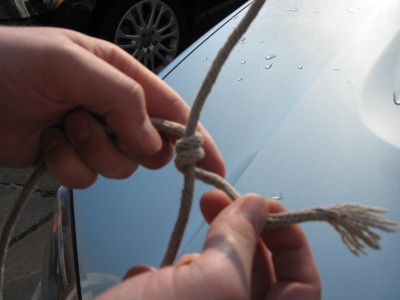

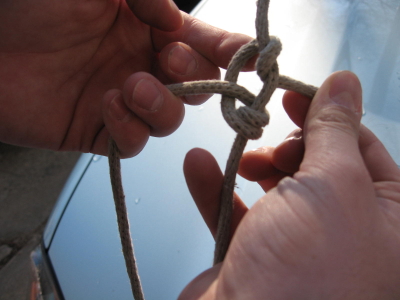
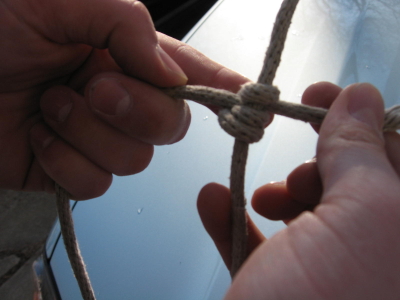
To tie the guide ropes I use a version of a slip knot. Above are the steps I use to tie the knot. Make sure the knot is tight
around the sliding rope. Once it's tight around itself, you can slide the knot up toward the boat and make the guide rope very
taut.
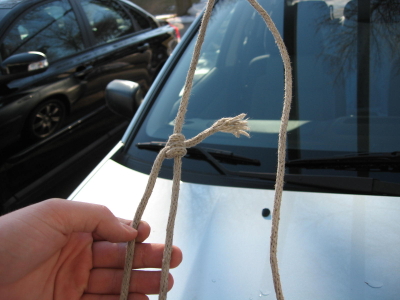
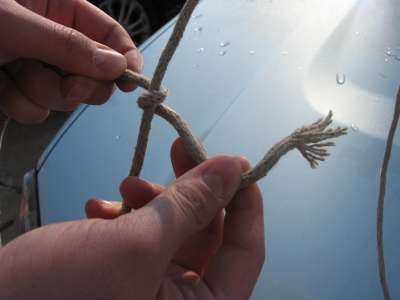
Here's the finished product. The left portion of the rope slides. You can hold the right portion of the rope and slide the knot up
until it's tight. Every time I stop while travelling I verify the tightness of the guide ropes and knots.
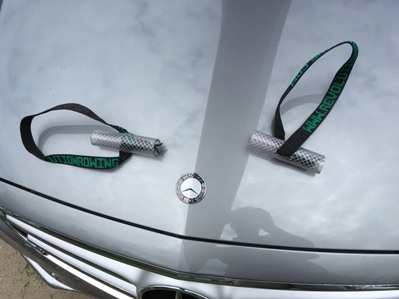
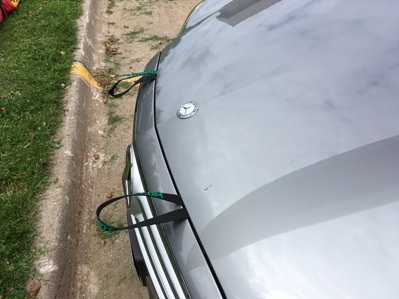
We recently bought a car that was difficult to tie off the guide ropes underneath the front.
Revolution Rowing
makes a cool Hood Tie-Down out of a piece of strap that you close into the hood or trunk and tie off the ropes to them.
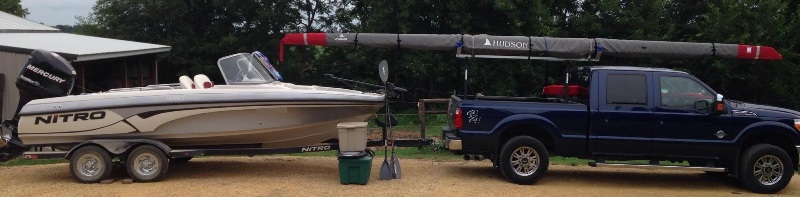
Attaching Oars to Roof Bars
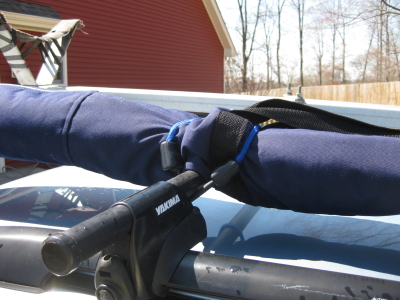
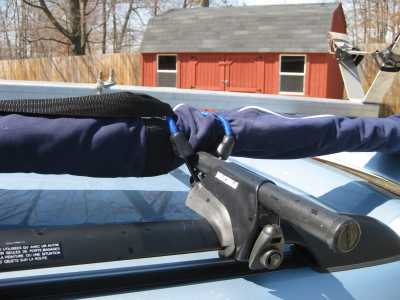
When attaching oars to the roof bars I just use two good quality bungee cords. However, when transporting with oar bags,
I usually like to secure the oar bag handles. Burnham includes some
nice nylon handles that like to flutter wildly at 70mph. To counter the fluttering I simply run the bungee cords
through each end of the handle as shown. Not perfect, but seems to work so far.
If you do not have oar bags, I usually place the sleeve on the front rack. The flat spots on the sleeve when held down with
bungee cords help prevent the blades from twisting at highway speeds. Always place the spoons toward the rear of the car.
If the blades face the front of the vehicle they will catch the wind and will mostly likely sway back and forth or just get pinched to
something sideways.
I've had people write and say they don't recommend nor prefer bungee cords for holding down oars. Yes, you have to be very careful and
make sure the hooks on the bungees will not rotate and come off. Alternatively, you can use straps. I have also made a set of very short
straps (about 2 feet) that I also sometimes use to secure my oars. You simply cut off an older, worn strap to the desired length. Then
use a lighter to melt the end a bit so the loose strands don't unravel. Below are a couple pictures of the oars being held down by
straps instead of bungees. Even with straps I still secure the handles of the oar bags so they do not flap in the wind.
Transporting with Riggers Still On
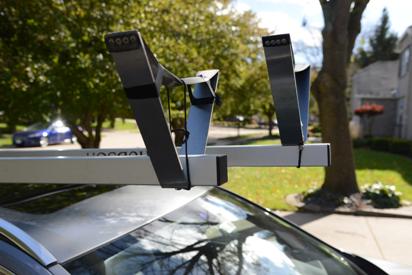
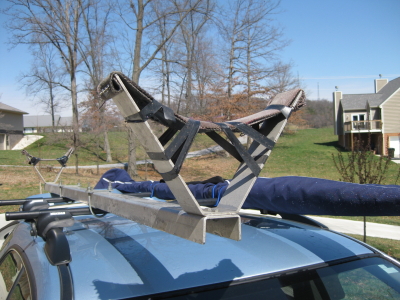
It's possible. Certainly for short distances it's no big deal. One recommendation is to raise the v-support, which is easy on Hudson roof racks.
In the above picture you can see the left single rack as it comes standard from Hudson. The V-support is attached underneath the main support bar.
Re-positioning to the top of the support bar requires loosening two bolts and re-attaching like the rack shown on the right. This allows for
a bit more clearance for the rigger.
Moving the v-support may also be a good idea if your boat cover keeps flapping and can reach the rack. An extra couple inches may be the difference
between a hole in your cover and not.
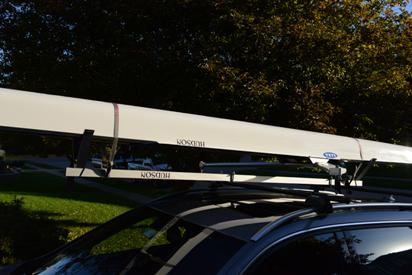
For me, transporting with riggers is all about positioning the rack. I shift the rack closer to the edge of the roof and tilt the boat a little.
One oarlock extends past the door a bit, and the other oarlock is then a number of inches above the roof. I've transported in high
crosswinds and never had an issue. When the straps and rig are tight, there's no real way for the boat to rotate and tap/scratch your car's roof.
Below you can see our Peinert on top of the Subaru with the rigger still on. You'll also notice the rigger sticking out past the passenger door a bit.
In both photos it's hard to discern the slight, ever so slight, tilt of the shell in the rack to lift the oarlock over the driver's head an extra inch
or so.
The two main issues are banging your head on the oarlock that extends past the roof line. There's a magic amount of tilt that allows you to still
open the car door and maintain a safety margin on the other side between the oarlock and roof. The other potential issue for long journeys would be
the rigger bolts vibrating loose. I've never personally transported super long distances (max was about 1.5 hours), but my assumption is that with
proper torque on the rigger bolts this isn't a concern. You don't drive down the highway and have bolts fly off your car chassis, do you? No, because
they're properly torqued.
I've only transported singles in this manner. I'm sure other boats are possible, but I've never attempted such a setup.
Ready to Roll!
And the finished product... Travel safe and good luck at your next regatta!
You can see that the boat above is actually still rigged. I've gotten many questions whether this is a good idea or not. Well... it depends,
in my opinion. With the above setup we actually stored our shells at our house and drove to a nearby lake to practice. De-rigging every time
we wanted to practice was a bit of a bummer. More importantly, the riggers spanned the roof so the oarlocks didn't hit the car, and we didn't
drive at highway speeds to get to the lake. Plus, the boat was a very old Peinert I picked up for
less than a grand. The rigger can act as an aerofoil in cross winds that might twist the boat in the rack resulting in your car getting whacked.
Or over longer distances at speed flexing the hull. If you're going any sort of distance at any sort of speed with a decent boat, I'd highly
recommend de-rigging. In all of my years of rowing for nine different clubs in three countries, the above was the only instance I routinely
transported with the boat still rigged.
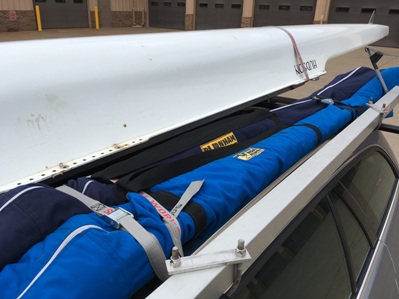
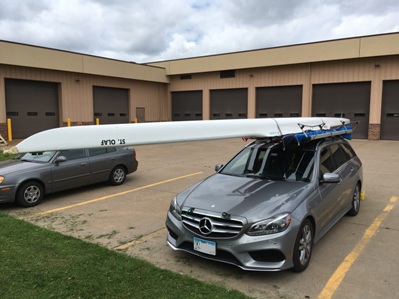
Carrying Doubles and Multiple Boats
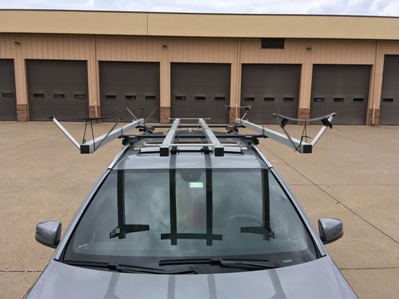
I routinely transport two singles and a double on top of my car. You can see the setup above comfortably accommodates the three required racks with
sufficient room for 3-4 sets of sculls between the racks. We have 58" bars for the Yakima rack. The boats nest nicely with the double guts down and
the singles lifted a bit by the racks. The extra gap is required for the oars.
I place the double in the middle since it's the longest boat and helps with turning radius when driving. You can place the single racks just inside
roof rack towers or just outside. I've done both, but with this particular vehicle it seems better to place the single racks just outside the towers.
As I mentioned above, my preference is to place the flat bar of the U-clamp on the flat part of the rack and the round part on the round bar beneath.
However, with our double there is interference with the gunwales so I must place them facing the car's roof. This put small marks into the aluminum rack,
but it doesn't damage the integrity of the rack.
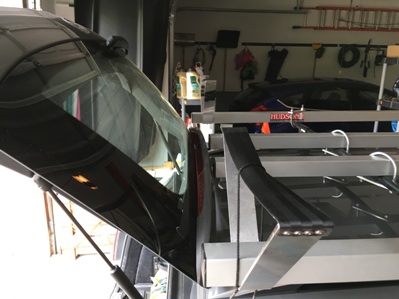
We've tended to have station wagons or hatch backs. So I position the racks on the bars so that the hatch door can go all the way up without
hitting the racks. This biases the boats a bit forward, which I think is a bit safer. Since you're normally looking forward you're more aware
of the distance to an object in front of you. Most instances of damage occur to the sterns of boats while being transported.
You can open the hatch or trunk lid with the boats on the car, but once everything is unloaded it becomes one less failure mode of the set up.
There is a big visual cue in front of you when the oars or boats are on the car to avoid slamming the trunk into something expensive. However,
when the boats and oars are off, you can see in the photo your sight lines become obscured as the lid rises. So if you forgot the rack might hit
the hatch you may cause some damage. Just a hint.

When loading the boats start with the center of the roof and work outwards. So in this case, it was Double, Oars, and then Singles. Many, many
people have written me about guide ropes, and I've seen many people successfully transport single without them. In terms of doubles, please, please,
use guide ropes. I have no idea how you'd transport such a long boat without stopping the forward and backward rocking.
Doubles are loaded guts down onto the rack as shown. You tie the boat down to the rack similarly as I outlined above for singles. One strap in the front
and rear of the rack near the shell rack cross bar. If you're leery of the setup you can add a strap or two around the hull and the Yakima/Thule roof bars.
However, those added straps are not substitutes for the ones at the end of the rack.
Just like a mentioned with the single strap, the tight piece at the bottom will have a tendency to vibrate in the wind. Tie off the excess end of the
strap to the strap as shown above to dampen the vibration.
Here's the double loaded with oars. If you don't have a boat cover with integrated tail flag you need to attach one.
Especially with doubles, if you're planning on going through toll booths or any other gates, please be careful. The front overhang can be tricky
hitting roadway sensors or getting a toll ticket without the gate hitting the bow of the double. Also, if you use an iPass/EZ Pass sensor, the boats can/will
block the sensor so I typically pull it off the window and hang my arm out the window to give line up sight to the readers.
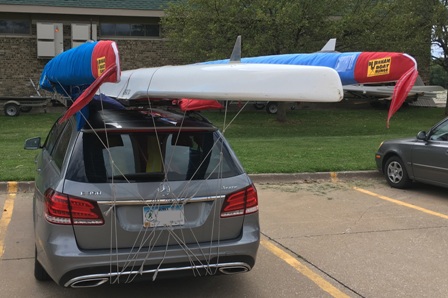
Here's the fully loaded setup with one double and two singles. It seems like alot of work, but it can mostly be done by one person
in about 30 minutes. You only require two people to lift the double onto the rack, but I've even done that myself in a pinch (not
recommended). In this rig I pushed the double forward as much as possible without interference with the rack then the singles
as far back as possible. The double was a club boat (not our personal 2x with a cover) so this "protected" the back corners with the brightly
colored covers and tail flags. Locating the double forward as much as possible also reduces the tail swing as you maneuver you car around corners,
gas pumps, other boats, etc. The photos were taken before I taped a small red flag to the double. I use electrical tape since it's
cheap, plentiful and leaves almost no residue if removed promptly.
A final note about overhang...
None of this may be legal in your area. Each country and US state varies in terms of allowable overhang. Regulations may also vary in terms
of flags, lights, overall length, front overhang, rear overhang, etc.
Please, do your research and don't get in trouble with the law.
User Submitted Rigs!
Send me pictures of your rigs after reading the site. I'll post them here.
» John R.
A buddy of mine was going on vacation with his kids (one of which rowed) and took a bunch of watercraft along. He asked for advice and I helped setup
the above rig. When we loaded the single the pleasure boat trailer was not attached, so I had no idea how close it came to the windshield.
We pushed the shell rack and shell itself as far forward as we could.
There were two major concerns with this rig...
1. He ignored my advice for guide ropes. The Thule rack on the truck bed wobbled
a bit forward and backward. With the shell rack it created a parallelogram so the wobble didn't seem to translate into the hull. But why risk it with a new Hudson!
2. The stern of the shell could come in contact with the trailered boat. I've seen it at regattas where you drive into a parking area and there is a dip.
The dip causes the trailer hitch to sink to the ground (i.e. truck hood in the air and rear of the trailer in the air). The overhanging shell
then comes into contact with the trailer. For this rig the hitch doesn't have to dip very much for the shell to contact the power boat.
This same dynamic occurs when a van pulls a normal rowing shell trailer. The overhanging 8's on the top
rack hit the top of the van.
He made it there and back (~6hr each way) without incident, but I'd deem this rig on the hairy edge. I would have bought roof bars for the top of the cab, which
would have dramatically reduced the chance of the two boats hitting each other by placing the rowing shell higher and more forward.
» Robbie S.
Thank you for the advice posted on your website, it was useful in gaining an appreciation of loading rowing shells on to vehicle roofs.
Both you and Carl Douglas have made important points on the use of guide ropes, and its
something that I impress the importance of to anyone Im able to bend the ear of on the subject. Often theres a desire for rowers
(also some scullers) to put as much tension as possible in to any sort of strap or tie, and thus they dont appreciate the importance
of the guide ropes, or they use the guide ropes to add some extra rocker to their shell.
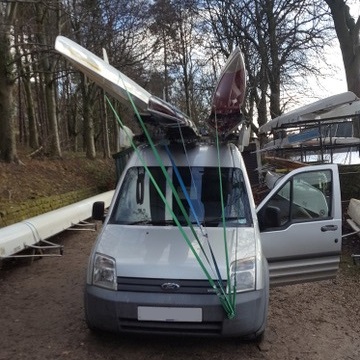
As per the note at the bottom of your car-topping page, Ive attached an image of my van in Sheffield as it was loaded for a trip to the
Scullers Head on the Thames in London. This is an image of three single sculls, two on carriers, a third on the 2.5 m spaced roof bars,
and three sets of sculling oars all mounted on my Ford Transit Connect LWB high top. It was a squeeze, but everything made it safely
there and back, we even came away with a Pennant.
Rathburn Home
doug@rathburn.net
© 2009-2021 Doug Rathburn
