Screening in our Back Patio (2008)
We moved to Cary/Morrisville for Doug's job with John Deere in June 2007
from Dubuque. At first, we only thought we'd be in the
house for a year, but Doug got another job in the same office. Since we'd be in the house for a bit longer, Erynn unleashed
her list of improvements to the house she wanted to get done. At the top of the list was screening in our back patio. A number
of our neighbors have their patio screened in and it's a nice upgrade to the house. The summers in this area are quite warm
and the mosquitoes. Even with the bugs repelled, it's still too hot
outside for Doug.
Click here to view photos of the rest of the house.
|
 |
Before

Here's a view of the covered patio from the property line. The little concrete extension to the left
of the photo was an extra upgrade apparently. The KB pricing model is to show a relatively low base price
then sock it to you with the upgrades. Our house was an inventory home so we didn't get to choose all of the
options -- one of which was a screened in patio.

The view from the kitchen door. (Photo was taking right after we moved in and doesn't show our fence, landscape wall and our dead
grass caused by the scorching NC heat.)
During Construction


The first installation was the ceiling fan. All of the ceiling lights were rigged so that ceiling fans could be installed
in the future. Basically, this meant the junction box and bracket were of the correct variety even though there was just a normal
light there before. The most annoying thing was that the ceiling has some thin strapping (you can see it cris-crossing the ceiling)
that was cut away around the old light. Finding the correct dimension piece of wood to fill the gap created by the ceiling
fan was a pain. It turns out that the thin scrap used to separate pieces of pressure treated lumber while it's on pallets was the
perfect size (approx. 1/8" by 2"). Lowes didn't even have a price for the scrap piece of
wood so they just gave it to us.
We chose not to use a special outdoor ceiling fan. The options for outdoor-use fan was quite limited, were much more expensive
and none matched our exterior fixtures. So we settled on a very cheap model that matched our fixtures figuring that since
the fan only cost about $60 we could swap it out for a new one in a few years and still be ahead. Since it's all set up, swapping
in a new one would be a snap.

The lumber for the rest of the project turned out to be another issue. Many of our neighbors used pressure treated pine.
As you can see from the photos above our house is trimmed in white paint. If the builder
had installed the screen patio at the time of construction they would have used pressure treated for the large corner columns.
Since ours wasn't they used nice white columns to match the rest of the house. So we wanted to carry on the theme and paint
the enclosure white. Pressure treated lumber can be painted, but ideally you need to let it dry out for a couple months before painting.
For us this implied either letting lumber dry out in our back yard or install everything and paint after. Both options implied
our screen porch would be complete after the mosquitoes left and would drag the project out too long.
Since we weren't going to use pressure treated and we like to through some resources at a problem to have it done right we chose
to use cedar lumber. Good quality cedar (i.e. not too many knots) is a great wood to work with. It accepts paint very well, it
easy to cut and last a long time. The downside is that it's much more expensive than pressure treated pine.
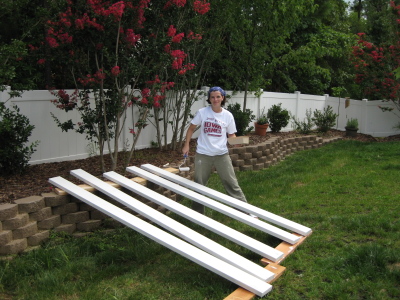
We ended up finding really good lumber and service at Capitol City Lumber in
Raleigh. Total tab for 19 2x6 and 58 2x2 boards was about $1,100. Because of the expense and adventure in DIY, we took care to
paint all of the boards before installation with one coat of primer and two coats of top coat. (Note the fence and landscape wall behind
Erynn.)
Framing in the Patio

As you can see from this photo, the columns has some nice detail before we started construction. The simple concept for screening
in the patio was to build an interior frame between the columns and house, but we didn't want to destroy the column details. So we
filled in the gaps along the column with 1x6 PVC boards so that we could then attached the main 2x6 cedar board from ceiling to floor.
We used stainless steel screws throughout and where boards were flush added construction adhesive to the mix.

We also didn't want the cedar boards to lie flush on the concrete so we cut a long strip of 1x2 PVC into 4" sections. We spaced
them about 8' apart along the floor board and secured with construction adhesive and two stainless screws. The resulting gap
between the board and concrete floor will hopefully allow water to drain away yet still be positioned/sized appropriately to keep mosquitoes out.


Once we encircled the opening with 2x6's, we then focused on the railing. The opening is split in half vertically by a 2x6 and
the railing ledge is also a 2x6.
The photo above shows some of the railing detail. The verticals are 2x2 and the banding at the top and bottom is a 1x2 created
by ripping some 2x2's in half with a table saw.


Some more photos of me installing the railing. Fortunately, it was about 97 degrees during the whole installation
because I need an excuse to lose 20 pounds of water weight.
We ended up using a railing height of 30" so that we could still see most of the back yard while seated. I had originally
planned for a higher railing of 34". The lumber yard only carried 8' long 2x2's so I could only get two railing verticals
out of each piece. Since we went with the lower railing I could then get three per board.
The concrete pad slopes away from the house. The railing you see in the photo that's parallel to the house is 30" high all the way
across. The perpendicular railings are level, which implies that the verticals are all a different length (shorter nearer the house).
Since we wanted to cut and paint before install, this posed some logistical issues. Basically, we'd cut a bunch of board, paint them
then install them. Repeat. We repeated the process about 9 times before everything was cut, painted and installed.

Two railings done!

The dogs were very concerned...
More Painting


Erynn was a painting fool.

Erynn's little sis, Amy, used to work in the paint department at The Home Depot while
working on her graduate degree. She strongly recommended using the Behr fence paint, which is actually a stain, for all of the boards.
It's a very good exterior paint that dries fast. We also used the recommended Behr primer. Also in the photo you can see what you need in North Carolina if you patio isn't
already screened in. The bugs are so bad we screened in our patio AND made a web site about it!

Next up was to install the door. I was lazy so I decided to hang the door and frame around it (making sure the
framing was level and square). We bought a really nice solid vinyl door from Screen Tight
(at Lowes) with the dog door already installed. The door came with the hardware and cost about $170.

One of the concerns we had with the door-side framing was that the floor board would not be supported. On the other sides without
the door, we just screwed the floor board into the column or other framing. We also didn't want to have to step over a board when
walking out the door to avoid a tripping hazard. Doug also relishes any excuse to buy more tools.
Therefore, the solution was to drill a couple holes into the concrete with a brand-new
Hitachi hammer drill (shown). I then filled the holes with construction adhesive
and dropped a couple 6" stainless steel bolts into the holes to keep the board from shifting while the door opens and closes or
people sit on the railing.
New tool count for this project: corded hammer drill (see above), jig saw (so Erynn can make a table out of the wood scraps) and a
small lithium ion battery hex driver (an incredible tool).
All of my tools are now Hitachi after owning many pieces of Dewalt. My
company, John Deere, has a joint venture with Hitachi making construction equipment so I thought I'd try one of their cordless drills
a few years ago and was very impressed. I've since expanded my work shop with large amounts of Hitachi gear and find the stuff
very durable, lightweight and powerful.


Once the board was "bolted" to the concrete pad I could then properly frame around the door.

And the framing is now complete!
Caulking


Caulk is an amazing thing. It makes everything you do look like it was done by a professional. Above are some pictures of my caulking
job. I used a good quality exterior caulk on many of the joints. Above you can see the railing joint before caulk (left) and after (right).


We used about 4 tubes of caulk with most of being used between the vertical boards screwed into the house and clapboards.
Ideally, I would have cut out the siding and installed the vertical boards against the house framing. However, something inside
didn't feel great about slicing big chunks of our nice siding off. Theoretically, we could remove everything you see here and
be left with an un-screened patio. So I just filled in the gaps against the house with caulk. You may also notice that we masked
along the house beside the board. Once the caulk started to firm up we removed the tape to leave a nice clean line on the grey house.
The picture on the right just shows another example of the seem-hiding qualities of caulk. You can see the black line disappear
as caulk is applied to the seam in the door jam.
Installing the Screen


Along with doors, Screen Tight also has screening systems. The screen comes in a few parts:
the black base with spline grooves, the screen itself, 0.175" spline, and the white decorative cover.
We used 20 of the black screen tracks and 26 of the white covers. We started by installing the black track along all outside edges.
The track has holes for exterior quality screws to secure it in place. Once in screwed in place, we could then installed the vinyl
screen material using the spline and screen roller. We started at the top rolling the spline into the track. By the time you finish
the fourth side, assuming you keep the screen a bit taught, you're left with a tight screen.

Cupcake thought she'd help out a bit too.


Once all of the screen is installed, you can install the decorative cover, which come in a variety of colors. Obviously, we chose
white. You start at one end and pound the white vinyl cover into its slot with a rubber mallet. The result is clean looking.
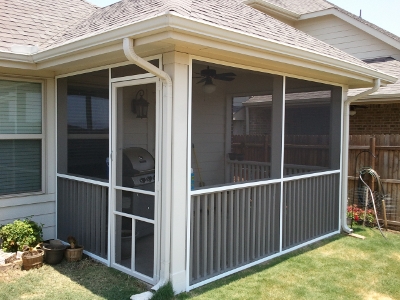
After


A view of the finished project from the back yard.

And the view out toward our back yard.
Satisfied Customer
A number of people have seen this site and written to ask questions. So far, one has even sent me a photo of their finished product.
If you've found my site useful send me an email with a picture of your patio and I'll add it here!
Shane Simpson's screened-in patio (June 2011)
Rathburn Home
doug@rathburn.net
© 2008-2011 Doug Rathburn